How my trees have developed over the years

This part of my blog will show you the development progress of some of my trees over the period of their training.
I will update this section periodically, so make sure to check back often.

Back to the Home Page

Back to the Home Page
Click image to return to home page

Wednesday 14 April 2010

Korean Hornbeam Group Planting

2000

2003

2004


2005


2006


2010

Monday 12 April 2010

Chinese Juniper Blaauws 2

I bought this tree as raw starter material from Greenwood Bonsai Studio in 2001 and gave it it's first styling the following spring.  The big flaw on this tree was the roots.  Basically there was one large coiled root with very few side shoots.  I decided to persevere and aimed for a slanting style where the one sided root system could be used. I shortened the long root by as much as I dared at the time, but I still had to coil it in to the bonsai pot, hence the awkward position of the tree in the first picture. The tree was planted in to a very open soil mix which basically consisted of grit, composted bark and vermiculite and was fed with pelleted chicken manure and bonemeal to help root development,

2002

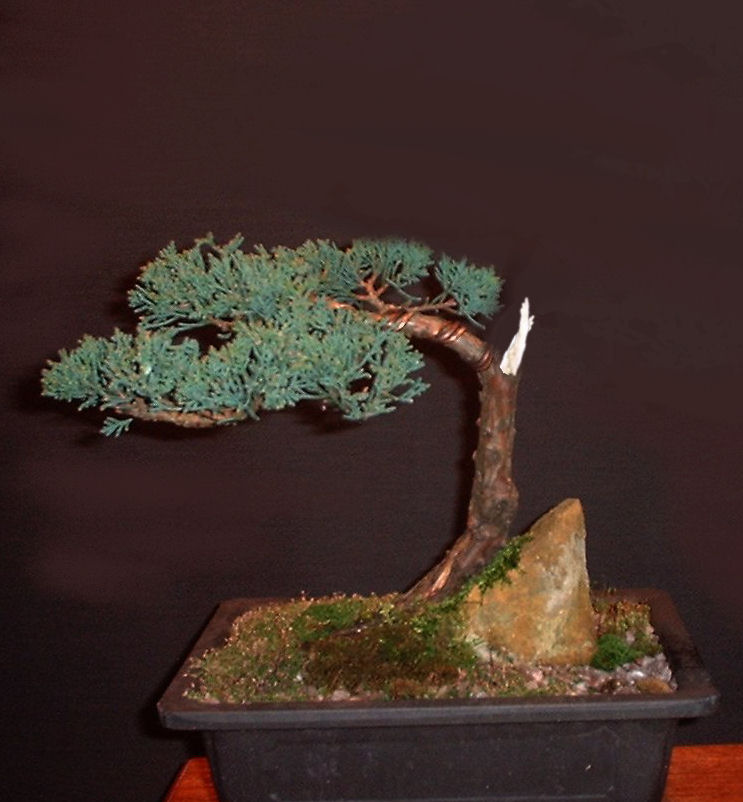
The tree was repotted in 2003 and the root had produced some fine feeder roots close to the trunk, which enabled me to shorten the main root further.  I found a piece of rock that pretty much fitted the curve in the lower trunk section to help and support the tree in the pot while the roots developed.  I continued with the same feeding regime and the tree put on good growth.  The new growth was pinched back regularly in order to develop the foliage pads.

2003

The tree had put on good growth and the foliage pads developed nicely, but the trunk did not really increase in diameter.  The root mass, while still one sided was now pretty fibrous and the long roof was removed completely. Feeding and pinching back continued as before.

2005

I was not happy with the proportion of the trunk to the overall height of the tree and decided to make a radical change.
Unfortunately I have lost the intermediate pictures due to fatal hard disk failure, so I have illustrated the process with the Computer enhanced images below.
 I chopped the tree above the first branch and used the secondary and tertiary branches to build a new apex and back branch. 
2006

The whole of the trunk and remaining branch were wired and a severe bend brought part A of the branch forward and up creating a new apex with small side branches.  This brought part C of the branch forward and down, making that the lowest side branch.on the right of the tree. Part B was brought around the back and  bent in to position between the new upper trunkline and the Jin left from removing the old trunk, in such a way that one part of it made a back branch and the other the left side branch.  .


The following year the tree was repotted and put in to a much shallower pot.  I increased the lean of the trunk to the left to give a better continuation of the base trunk line and to expose some surface root.  As you can see, the rock remained as part of the composition.  The tree was fed with Bio Gold and continuous pinching has built up the foliage pads.

The picture below is a current photo of the tree.
Further development will see the foliage pads thinned and defined in order to separate them and make the canopy lighter.

2010

Chinese Juniper Blaauws

I bought this tree in the autumn of 2001 from Greenwood Bonsai Studio.  The tree was on offer on the pre-owned table and at £55 presented excellent value for money, even if it would have been raw stock.  This bonsai obviously had some previous training, but was unusual in shape for a juniper.  It more or less resembled a Broom style, with both of the lower primary branches forming part of the canopy.  There was no definition to the foliage mass and a many of the inner branches were covered in dead and weak growth due to lack of light and air.  I started styling the tree in spring of 2002, by thinning out a lot of the existing foliage so that I could see the structure of the tree and branches.
With that straight  trunk, no lower branches and most of the foliage in the upper half of the tree, it suggested  a literati, but I decided to try and lower the right hand primary branch and go for a slanting style.
2002

The branch was lowered with the aid of a guy wire which was gradually tightened over the next year.  The planting angle was changed at the next repotting and the tree was fed and watered copiously to encourage growth.  Foliage was pinched in order to keep growth tight and develop foliage pads. I shortened that long jin spiralling around the main trunk as it did nothing for the image and looked out of place.

2003

Later that year I removed the left fork of the trunk in order to bring more balance to the tree and lighten the canopy .  (BTW - I planted the severed branch as a cutting, which to my surprise produced roots the following spring and was used to produce a nice shohin Tanuki - more in a later report)

2003

The tree was repotted in to a much shallower pot in 2004. It was growing strongly following the repot, but suffered a major attack of  Juniper scale in June which caused a lot of the foliage to turn brown and die off.
This was treated with a malathion based insecticide which eventually cleared the infestation.  With the tree under stress, I decided not to work on the tree for the remainder of the year, focusing instead on aiding recuperation with a light feeding regime.

2004

2005 saw the tree fully recovered and the heavy feeding was reinstated.  The tree responded with good growth and the foliage pads started to fill out, hinting at the future shape of the tree. Branches were wired to finalise branch placement and foliage was pinched to keep it tight.

2005

Below is the current picture of this tree.  As you can see the foliage is now rather heavy and in need of major thinning.  
2010

Future styling will concentrate of further lowering the first branch on the right to narrow the angle between the branch and the trunk.  The right hand branches higher up on the tree will need to be lowered to the same degree to keep the flow consistent.  All the foliage pads will need to be thinned and defined in order to lighten and balance the image.

Saturday 10 April 2010

Arakawa Maple

The tree was started from a cutting from a Greenwood Bonsai Studio workshop tree in 1995.  It was grown in a grow box for 5 years before being transferred to a bonsai pot in the spring of 2001.
2001

The tree adjusted to life in the bonsai pot without problems and thrived under a feeding regime that included Miracid.  The growth was somewhat course and internodes remained long.  That first major branch growing from the inside of a bend continues to be a thorn in my side, but I was hoping that it would help to thicken the trunk below this point, so I decided to keep it for the time being.
2002

The tree was repotted into pure Akadama to help with root development and give sufficient moisture holding capacity for my erratic watering schedule.  As most beginners coming to bonsai, I read many books talking about leaf cutting, shoot pinching and other such techniques.  What most of these books fail to mention is that these techniques are really the final stages of development and  I probably did more harm then good applying these to this tree in this early stage of bonsai training.

2003

The tree suffered a major setback through a massive infestation of scale insect that which I failed to detect before major damage was done.  The tree was obviously suffering, with yellowing wilting leaves and poor growth.  I initially thought that there was a problem with the soil, roots or the fertilising regime. After investigation all of these were eliminated as the cause of the problem.  There was no visible sign of pests or fungal infection, and I was at a loss on what to do next.  It was my father in law who found the scale insect hidden underneath the branches.  These insects looked much like the corky spots of bark that had started to develop along most branches now and were virtually invisible, but on closer inspection, every branch and the whole trunk was covered with the pests.  I removed as many as I could by hand and used a systemic insecticide to clear the infestation for good.  The tree slowly recovered over the next few months under a soft fertilising scheme.  Needless to say, the tree (and all my other trees) now get two applications of a Winter Tree Wash to prevent a repeat.
2004

The tree has developed nicely and the corky bark had started to cover the smaller branches and most of the trunk now. That awkward first branch was now less of a problem as the trunk below it is starting to thicken, but I was not happy with the overall image of this tree.  The current front leaves the back of the tree fairly bare and makes it quite two dimensional. 
2006


I have now changed the front view to make the most of the root to trunk transition which has filled out nicely over the last few years and using that third trunk to fill out the back of the tree has given the image good depth.  The drawback was that to achieve this I had to let the tree grow strongly and it has lost some of the finer ramification.  This will be brought back over the next few years through pruning and pinching and leaf cutting 
Unfortunately the tree was blown off the display bench during the spring storms in 2009 and the apex broke off.  I am currently regrowing a new apex which will add another 10cm to the current height of the tree.

2010

Cotoneaster Root over Rock

I found this tree back in 2001, when I was clearing an old rockery from our garden.  It had self seeded itself on to a piece of tufa rock and the roots had grown right trough some of the soft rock.  While not much to look at at the time, I decided to put it in to a bonsai pot and see what could be done.

A year after being dug up it had adjusted well to life in a bonsai pot and was filling out nicely

In 2003, the pads developed well, but the overall image was poor.  The spindly trunk refused to thicken and the branches were too heavy. The tree looked as if it was going to topple over any minute.


I finally plucked up the courage in 2005 and chopped off everything above the first branch. The tree was wired and a new trunk line was established from the primary and secondary branches of the one remaining foligae pad.  I also allowed a secondary trunk to grow from the roots in order to try and thicken the base.


This is the tree as it stands today, just leafing out in March of 2010.  I will continue to develop the secondary trunk as a cascade and may well further reduce the height of the main tree in order to bring the trunk in to proportion.

Chinese Elm

This was my second Bonsai, bought for £9.95 in 1994 (the first sadly died shortly after it was given to me as a present).  It was a typical mass produced  "Garden Centre Bonsai" that you will find in many Home Stores, Supermarkets and Garden Centres.  Having learned from my earlier mistake, I read a lot of books and signed up for some Beginners Bonsai Course at Greenwood Bonsai Studio and I managed to keep this one alive.

Having read more books and taken more advanced courses, I soon built up a stock of  "proper" Bonsai and realised that this little tree would never really be a contender.  So I decided to radically change this tree.
It was planted in a garden bed for 5 years and basically left to grow wild.  I chopped it back in the winter and kept it trimmed to a pyramid shape during the summer.  In year three, the roots were undercut to make lifting easier when the time came.  I finally lifted the tree in the winter of 2000 and planted it in a big stoneware pot to recover

The tree was now over 4 feet tall and had thrown up a sucker trunk from the roots.  In order to bring the trunk in to proportion for my planned design, I air layered the top half of the tree and got myself a free tree as a bonus.
The bottom part of the tree remained in the big pot and was wired for shape.  Branches were developed by wiring and pruning and the roots improved through ground layering techniques.


The tree was finally planted in to a round drum pot in 2009 and is a far way from the sad little tree that it started out as.  Development will continue to increase ramification and refine the root spread, which looks a bit artificial.  I will also need to consider a shallower pot to enhance the overall image.